Barcode Scanner SDK
Zebra SE4710 Barcode Scanner SDK
Introduction
The following information is intended exclusively for software developers who want to program their own application for the Scoria A104, Scoria A105 or Scoria M240 with Zebra SE4710 scanner. It enables retrieval of scan results and software-based triggering of the scan button.
If you have any questions or suggestions for improvement, please send an e-mail to [email protected].
Tools and environment
- Android 9+
- Android Studio 3.x
- JDK 1.8
Principles for implementation
- MVC mode,
- rxjava2+retrofit2 network request framework.
- easypermissions permission request.
- greenDAO database
- serial communcation
Main process
The scan app has different buttons and scan hardware models for different devices, so we need to configure a lot of different information to customize the app to the device. We place a configurable file named scanner_config.xml under vendor/etc/ at the framework layer. When the app is opened for the first time, we read the xml configuration file to get the basic configuration of the scanning app. The file looks something like the following:
Initialization of the scan engine
Scanner.init(readerId, context, callback);
or
Scanner.init(readerId, context);
ReaderId is the camera ID, which can refer to the ReaderID element in the scanner_config.xml file specified by the device (the file path is vendor/etc/scanner_config.xml); the context parameter can be passed to the application context.
The callback parameter is optional and can monitor the start (onStart) and finish (onFinish) of the initialization process.
Set callback for scancode
Scanner.setDecodeCallback(decodeCallback);
In the decodeCallback parameter, the parameter data passed by onComplete is the original data returned after scanning the code.
Start scanning
Scanner.startDecode(callback); or Scanner.startDecode();
The callback parameter is optional and can monitor the start (onStart) and end (onFinish) of the code scanning process.
Stopping scanning
Under normal circumstances, scanning stops when decoding is complete or the timeout is reached. If you need to stop scanning manually, you can call Scanner.stopDecode();
Get scan result
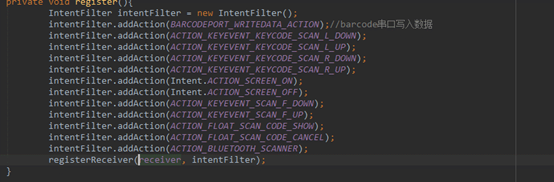
Basically, data transmission and key monitoring in hard-decoded scanning are implemented by broadcasting, which plays an important role in the app. When the service is on, we monitor the transmission of all keystrokes. Code:
The monitored broadcast is uniformly accepted and processed, including keystrokes and some initialization operations. The code is as follows:
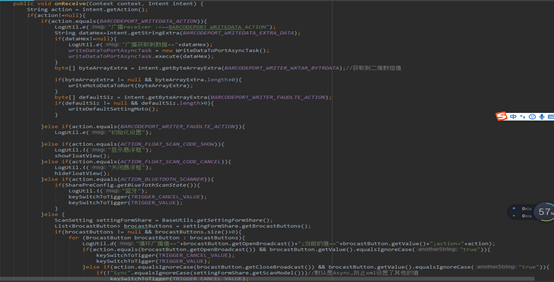
When we poll the key broadcast, we respond to it. The device has the function of triggering the key broadcast. Pressing the key triggers the "Down Broadcast" and releasing it sends the "Up Broadcast". When the scan button is pressed and the "Down Broacast" is triggered, the method that calls the opening of the scan head starts.

The reason for the first abort is that it is guaranteed to be in a non-triggered state before it is triggered.
!!!Release the dock-sweeping resources
Scanner.release();
Other functions
Check availability
Scanner.isAvailable(); returns true if it is available, and must call init to initialize if it is not.
Set parameters
Scanner.setParameter(param, value);
Set the value of the parameter param to value. The exact list of adjustable parameters and optional values can be found in the module's development documentation, which can be downloaded here: https://support.werocktools.com/download/manuals/Zebra_4710_SWDecodeAndroid_IG(Software_decode).pdf.
Call parameters
Scanner.getNumParameter(param);
Scanner.getStrParameter(param);
Scanner.getNumProperty(param);
Scanner.getStrProperty(param);
Reset parameters
Scanner.setDefaultParameters(); resets the scanner's parameter configuration to factory default.
Customizing the broadcast address
If you need a specific broadcast address for your application, proceed as follows:
To change the broadcast address, do the following:
- in the Scanner Configuration app, tap the gear icon in the upper right corner. 2.
- then tap on "General Settings
- now tap on "Config data brodacst", change the values and confirm the entry with "OK".
Examples of use
Reference library
Add common.aar and lib4710.aar to your project.

Add the following repository in the build.gradle android file:
repositories {
flatDir {
Verzeichnisse 'libs'
}
}
Add the dependencies
implementation(name: 'common', ext: 'aar')
implementation(name: 'lib4710', ext: 'aar')
!! add permissions
Add android:sharedUserId="android.uid.system" ito the AndroidManifest.xml file.
Note: After adding the system uid, you need to use the system signature (you can contact the developer to get it) before it can be used normally.
Initialization
After calling init to initialize, set the callback to complete the scan code
// Initialize the sweep port
Scanner.init(2, mContext);
// Set the scan code completion callback (requires after initialization)
Scanner.setDecodeCallback(new DecodeCallback() {
@Override
public void onComplete(byte[] data) {
// data is the original data obtained by scanning the code
// Process scan results here
}
});
Monitoring the scan code keys
By default, all physical scan keys always trigger one of the following three groups of transmissions after being pressed/opened:
static final String ACTION_KEYEVENT_SCAN_F_DOWN = "com.android.action.keyevent.KEYCODE_KEYCODE_SCAN_F_DOWN"; // Scan code F key DOWN broadcast
static final String ACTION_KEYEVENT_SCAN_F_UP = "com.android.action.keyevent.KEYCODE_KEYCODE_SCAN_F_UP"; // Scan code F key UP broadcast
static final String ACTION_KEYEVENT_SCAN_L_DOWN = "com.android.action.keyevent.KEYCODE_KEYCODE_SCAN_L_DOWN"; // Scan code L key DOWN broadcast
static final String ACTION_KEYEVENT_SCAN_L_UP = "com.android.action.keyevent.KEYCODE_KEYCODE_SCAN_L_UP"; // Scan code L key UP broadcast
static final String ACTION_KEYEVENT_SCAN_R_DOWN = "com.android.action.keyevent.KEYCODE_KEYCODE_SCAN_R_DOWN"; // Scan code R key DOWN broadcast
static final String ACTION_KEYEVENT_SCAN_R_UP = "com.android.action.keyevent.KEYCODE_KEYCODE_SCAN_R_UP"; // Scan code R key UP broadcast
You can monitor these three broadcast groups of transmissions, start scanning the code when the down transmission is triggered, and stop scanning the code when the up transmission is triggered.
You can monitor these three broadcast groups to determine when one of the buttons has been pressed to then start the scanning process.
// Scan code button broadcast response
BroadcastReceiver triggerReceiver = new BroadcastReceiver() {
@Override
public void onReceive(Context context, Intent intent) {
switch (intent.getAction()) {
case ACTION_KEYEVENT_SCAN_F_DOWN:
case ACTION_KEYEVENT_SCAN_L_DOWN:
case ACTION_KEYEVENT_SCAN_R_DOWN:
// Press to start scanning
Scanner.startDecode();
break;
case ACTION_KEYEVENT_SCAN_F_UP:
case ACTION_KEYEVENT_SCAN_L_UP:
case ACTION_KEYEVENT_SCAN_R_UP:
default:
// Pop up to stop scanning
Scanner.stopDecode();
break;
}
}
};
If you do not need to monitor the keystroke, you can use Scanner.startDecode() and Scanner.stopDecode() to call the function directly.
Note: If you need to trigger the scan process continuously, the interval between the last completion and the next start should be more than 100 ms, otherwise the process may get stuck.
Simulate scan button to trigger the scan process
You can simulate the pressing of a scan button:
public static final String ACTION_KEYEVENT_SCAN_F_UP = "com.android.action.keyevent.KEYCODE_KEYCODE_SCAN_F_UP";
public static final String ACTION_KEYEVENT_SCAN_F_DOWN = "com.android.action.keyevent.KEYCODE_KEYCODE_SCAN_F_DOWN";
Get scan result
com.android.serial.BARCODEPORT_RECEIVEDDATA_ACTION is the broadcast that means the scan was successful. After receiving this broadcast, you just need to retrieve 'DATA' from Intent, then you can get the scan data. The data type is a string.
public static final String BARCODEPORT_RECEIVEDDATA_ACTION = "com.android.serial.BARCODEPORT_RECEIVEDDATA_ACTION";
public static final String BARCODEPORT_RECEIVEDDATA_EXTRA_DATA = "DATA";
Change the status of the scanner
static final String ACTION_CHANGE_STATE_ENABLE = "com.zebra.action.CHANGE_STATE_ENABLE";
static final String ACTION_CHANGE_STATE_DISABLE = "com.zebra.action.CHANGE_STATE_DISABLE";
Release resources
When you exit the program completely, call Scanner.release() to release the scan port and resources.
Turning the device on and off and triggering shutdown
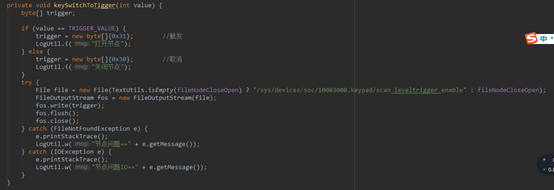
The device triggers scanning by sending instructions to the framework layer through the app. You must turn on the operation before using the scan. The command code is as follows:
Power on Operation

The trigger scan can be realized after power on, the code to trigger and close the scan head:
Version information
|
Version |
Datum |
Notizen |
|
1.0 |
|
Initial release |
|
1.1 |
04.08.2022 |
Complete revision and standardization of content |