Battery Charger
Battery charging stations are available for the Rocktab U212 and Rocktab U214 tablets. These are not compatible with each other due to different battery dimensions. However, the further functionality is identical. The battery charging station supports charging one battery or two batteries at the same time.
Package contents
- Battery charger
- 19 V AC power supply
- AC cable
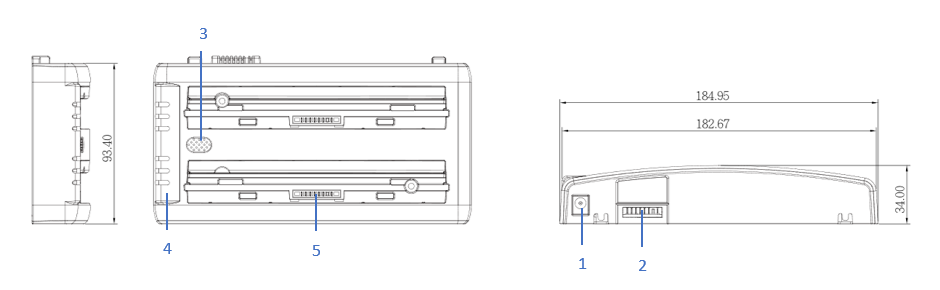
Product overview
|
1 |
19 V DC charging socket Connection of the battery charging station to the power supply unit |
4 |
LED display Indicates the current charging status of the battery: Lit red: Battery charger is on and ready to charge. Yellow: Charging in progress. Green: Battery capacity is more than 95% full. Flashing red: Error during charging. |
|
2 |
Battery charging station connector Connects up to three battery charging stations to each other. |
5 |
2 x Battery charging bay |
|
3 |
Buzzer Indicates a warning in the event of a charging error: Single short beep: power input detected / battery pack detected. Repeating double beeps: charging error. |
|
|
Connecting battery charging stations together
- Before connecting the charging stations together, please make sure the direction is as below. Align the tabs on the sides and gently push down on the charger to lock the other charger.
- Make sure the chargers and the connectors on the side are well connected. There should be no obvious gap between the chargers.
The charger can only charge up to three battery chargers (six batteries) due to the adapter power.
Setting the buzzer
The default setting for the built-in buzzer is OFF. To activate this feature or adjust the volume of the buzzer, please use the switch on the bottom of the charger.
|
Switch |
Description |
|
3,4 |
Mute |
|
1,2 |
Maximum volume |
|
2,4 |
Medium volume |
|
1,3 |
Minimum volume |
Using the device
Power supply of the battery charger
To power the battery charger:
- Connect the AC adapter with power cord to the charger.
- The charger will beep when power is detected (buzzer is off by default), and the LED indicator will turn RED to indicate that the battery charger is ready for use.
Inserting the Battery Pack
Safety Precautions
- Do not operate the charger with a damaged cable or plug. Have the cable replaced immediately.
- Use appropriate adapters to connect the charger to the wall outlet.
- Always unplug the charger when not in use.
- Do not expose the charger to rain or snow.
- NEVER charge a frozen battery. If the battery fluid (electrolyte) is frozen, move it to a warm place to thaw before charging.
- Make sure the room where the battery is being charged is well ventilated.
- Do not get the battery wet or immerse it in water.
- The battery should be charged at least every three months to avoid shortening the battery life.
- Do not squeeze or puncture the battery to prevent electrolyte leakage from the lith
To insert the battery.
- Place the battery connector down and align the edge of the battery with the side of the charging slot. Insert the battery until the battery connector is firmly connected to the charging pins.
- The charging station will beep when the battery is properly detected (the buzzer is off by default). The LED indicator will then turn YELLOW and the charger will automatically begin charging.
The estimated charging time for a full charge is between 3 and 6 hours, depending on the size of the battery. The estimated charging time may change depending on the condition of the battery.
Removing the Battery
To remove the battery:
- The LED indicator will turn GREEN when the battery is more than 95% charged.
- The charger will stop charging when the battery is fully charged.
- Please remove the battery directly.