Konfiguration des Barcodescanners
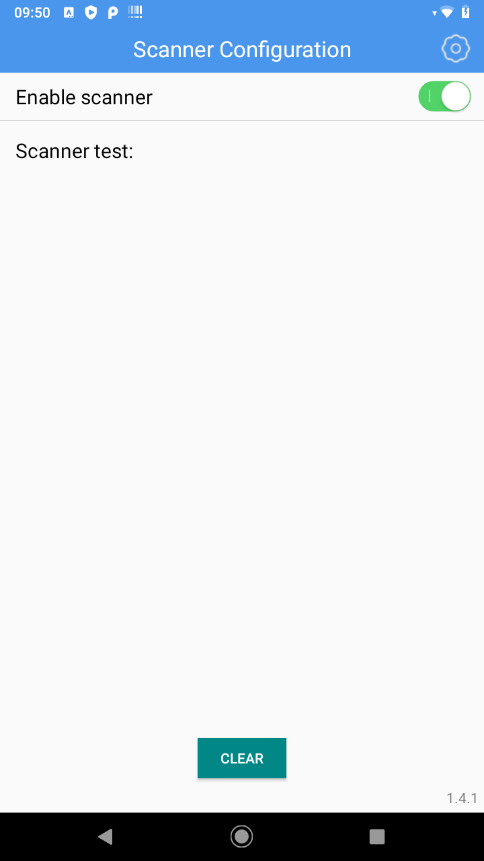
The "Scanner Configuration" application, which is supplied on your device, is the software interface for your barcode scanner. This application must always be active for the barcode scanner of your device to function.
Note: Depending on the resolution and version status on your device, the display and designations may differ slightly.
Launch app
The application is started automatically when the device is booted. If you accidentally quit the application, you can restart it at any time from the application list.
Interface
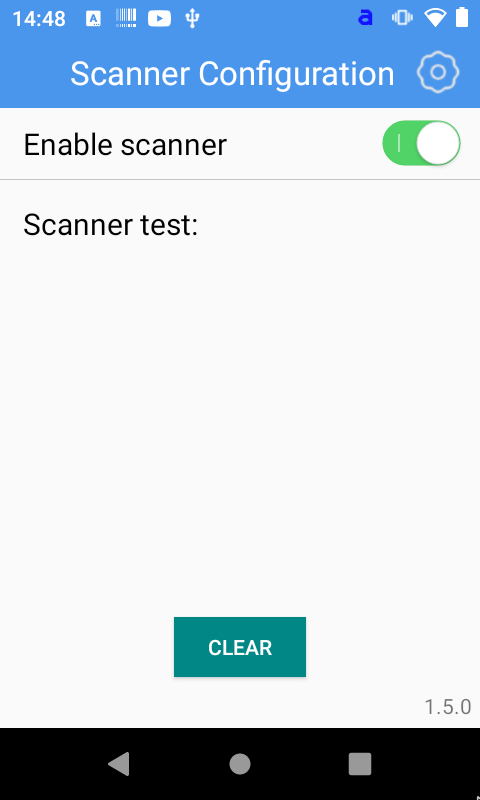
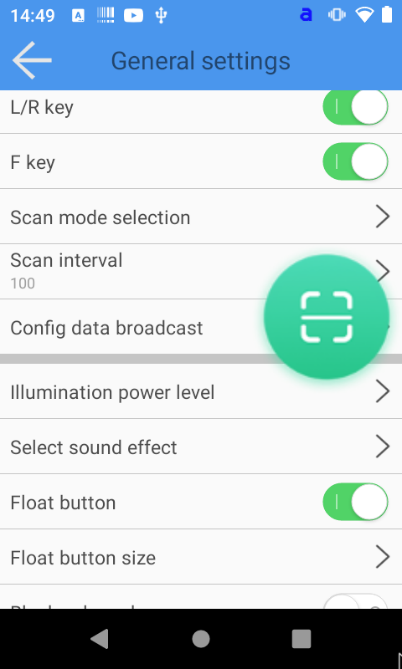
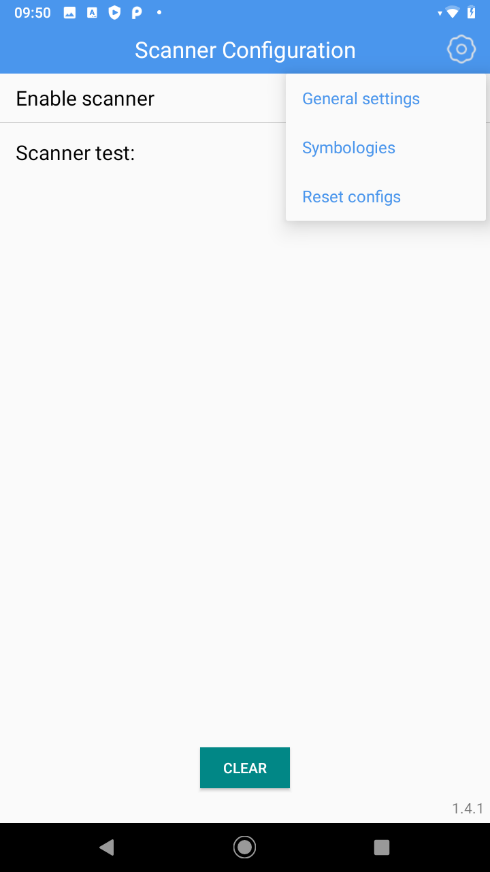
Use the "Enable Scanner" button to turn the barcode scanner functionality on and off. Tap the ![]() gear icon at the top right to make general settings for the barcode scanner, set up barcodes to be scanned or reset the settings.
gear icon at the top right to make general settings for the barcode scanner, set up barcodes to be scanned or reset the settings.
Supported symbologies
This device supports the following code types:
- Code 39
- UPC-A
- UPC-E
- EAN-13/JAN-13
- EAN-8/JAN-8
- Discrete 2 of 5
- Interleaved 2 of 5
- Codabar
- Code 128
- Code 39
- Code 11
- MSI
- UPC-E1
- Trioptic Code 39
- GS1-128
- ISBT 128
- US Postnet
- US Planet
- Japan Postal
- Australia Post
- Netherlands KIX Code
- GS1 DataBar-14
- GS1 DataBar Limited
- GS1 DataBar Expanded
- Composite CC-C
- Composite CC-A/B
- Composite TLC-39
- Chinese 2 of 5
- Korean 3 of 5
- USPS 4CB/One Code/Intelligent Mail
- UPU FICS Postal
- Matrix 2 of 5
- PDF417
- MicroPDF417
- DataMatrix
- QR Code
- Maxicode
- MicroQR
- Aztec
- Han Xin
- DotCode
Barcode scanner setup
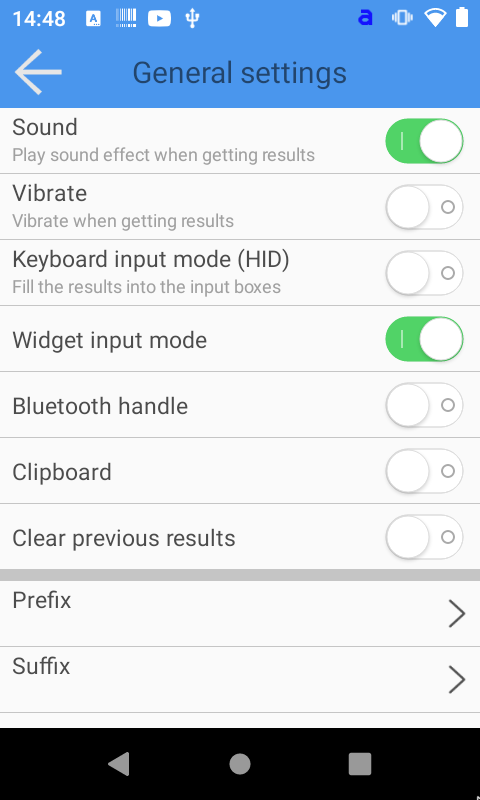
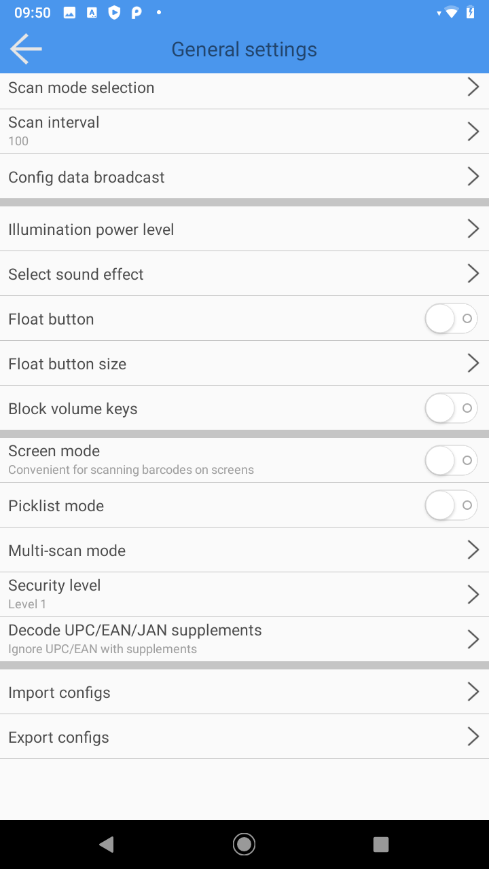
In the Scanner Configuration App, tap the gear icon in the upper right corner and then tap "General settings" to make settings about the barcode scanner.
Confirmation of successful reading
To let you know if your barcode was successfully captured, you can get an additional confirmation from your device. There is an option to receive a beep, a short vibration, or both at the same time. To make these settings, do the following:
- in the Scanner Configuration app, tap the gear icon in the upper right corner.
- Then tap on "General Settings".
- to enable audible notification, tap the toggle switch at "Sound" so that it is highlighted in green.
- To activate a haptic notification, tap the toggle switch at "Vibrate" so that it is highlighted green.
The changes are applied immediately..
There are three different tones to choose from for the audible notification. To adjust the acoustic notification, proceed as follows:
- in the Scanner Configuration app, tap the gear icon in the upper right corner.
- Then tap on "General Settings".
- then tap on "Select Sound effect" and select the desired acoustic notification. 4. confirm the new behavior.
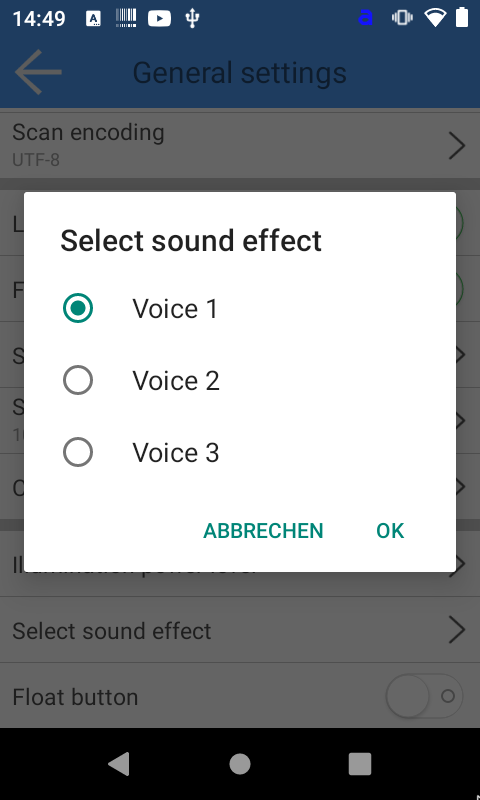
- Confirm the new behavior by tapping on "OK". The changes become active immediately
Setting the input mode
Your device has two different input modes:
Keyboard input mode: enters the barcode character by character into a field. (default)
Alternate input mode: Enters the barcode as a complete block. This mode is useful if the string is to be entered into a field that performs search operations directly as it is entered. To customize the input mode, do the following:
- In the Scanner Configuration app, tap the gear icon in the upper right corner.
- Then tap on "General Settings".

To enable keyboard input mode, tap the toggle switch at "Keyboard input mode" so that it is highlighted in green.
To activate the alternative input mode, tap the toggle switch at "Widget input mode" so that it is highlighted green.
Connecting a Bluetooth scan trigger
As an optional accessory, a Bluetooth scan trigger may be available for your device. It communicates with the device via Bluetooth and can be connected to the device via two screws on the bottom side.
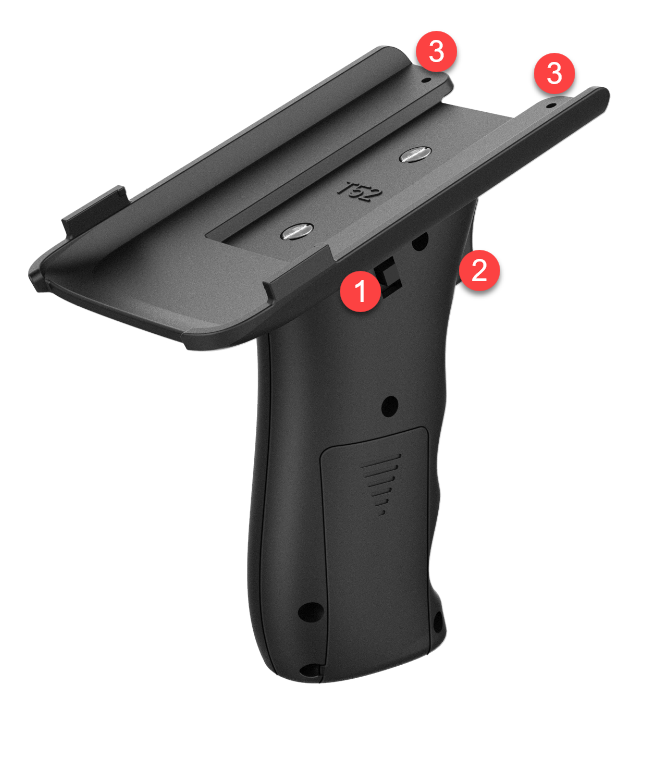
- on-off switch
OFF = The handle is switched off
ON = The handle is switched on - Scan Button
When the Scan Trigger Handle is connected to the device, press this button to start the scanning process - Screw holes
Screw holes to firmly mount the Scan Trigger Handle to the device. The screws are included in the accessories
LED Indicator
|
Status |
Meaning |
|
LED light off |
The Scan Trigger Handle is not switched on |
|
LED light on |
The Scan Trigger Handle is successfully connected to the device |
|
LED light flashing (1 sec. interval) |
The Scan Trigger Handle is switched on, but not yet successfully connected to your device |
|
LED light flashing (0.5 sec interval) |
The Scan Trigger Handle is in pairing mode and can be connected to a new device. |
Pairing
- Make sure that Bluetooth is activated on your device. You can recognize this by the small Bluetooth symbol next to the battery display. 2.
- Start the pairing mode of the Scan Trigger Handle by first pressing the Scan Trigger (2) and then the on/off switch (1). The LED starts to flash quickly. Keep the Scan Trigger pressed until the LED flashes more slowly. 3.
- Open the Bluetooth settings of your device and select "BLE_Handle". After successful connection, the LED of the Scan Trigger Handle lights up continuously.
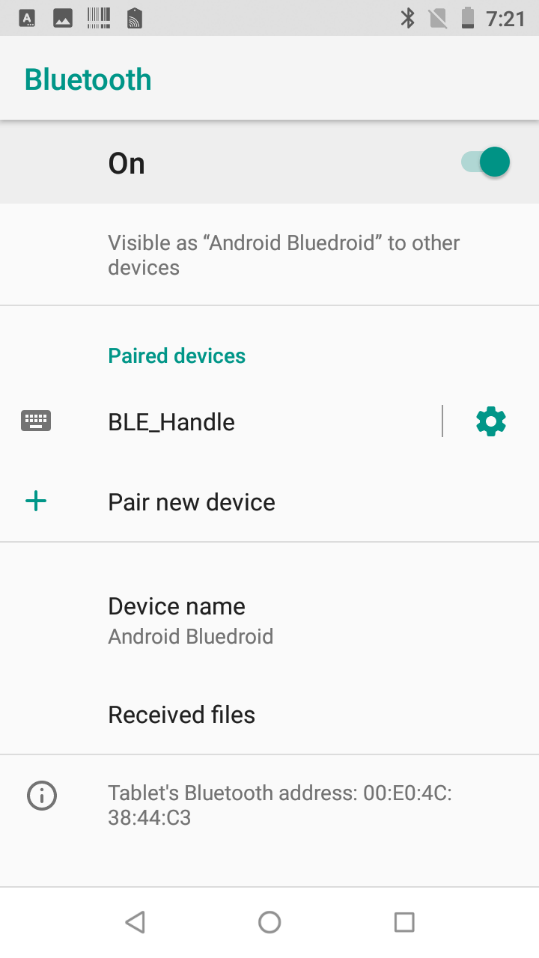
- Finally, the handle must be connected in the scanning app by activating the "Bluetooth Handle Open" function under "Settings":

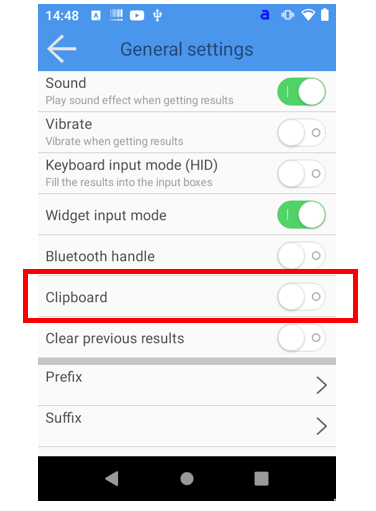
Save scan result to clipboard
The scanner interface can extend your scan result with characters before the scan result (prefix) or after the scan result (suffix). To add a prefix or suffix, do the following:
- In the Scanner Configuration app, tap the gear icon in the upper right corner.
- Then tap on "General Settings".
- to enable saving the scan result to the clipboard tap the toggle switch at "Clipboard" so that it is highlighted in green.
Make settings for prefix or suffix
The scanner interface can extend your scan result with characters before the scan result (prefix) or after the scan result (suffix). To add a prefix or suffix, do the following:
- In the Scanner Configuration app, tap the gear icon in the upper right corner.
- Then tap on "General Settings".
- now tap on "Prefix Content" or "Suffix Content" and enter the corresponding values.
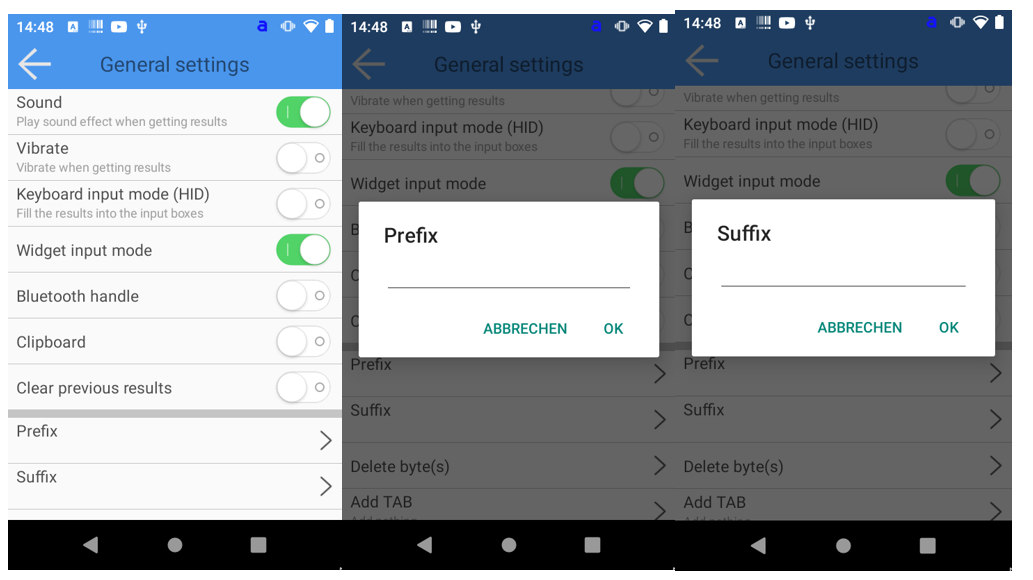
Finally, confirm each entry by pressing "OK". The changes are applied immediately..
Configure action after barcode capture
After a successful scan, a control signal can still be attached to the barcode. There are three possibilities for this.
- insert tabulator character before the barcode
- insert tabulator character after the barcode
- execute line break (Carriage Return / Enter) after the barcode
You can also combine tab and carriage return.
To make the settings, proceed as follows:
Insert tab character before or after the barcode
- In the Scanner Configuration app, tap the gear icon in the upper right corner.
- Then tap on "General Settings".
- then tap on "Tab" and select the desired property:
- "Add in front" adds a tab control character in front of the barcode
- "Add behind" adds a tab control character after the barcode
- "Close" does not add a tab control character barcode
- finally confirm the input by pressing "OK
Execute line break (Carriage Return / Enter) after the barcode
- in the Scanner Configuration app, tap the cogwheel icon in the upper right corner
- then tap on "General Settings
- now tap on the toggle switch at "Enter" so that it is highlighted in green.
Replacing characters
The software interface of your device can manipulate the output of the scanned barcode by exchanging certain characters for others. This can be useful if the target application regularly requires a different code format than is given.
To exchange a specific character, proceed as follows:
- In the Scanner Configuration app, tap the gear icon in the upper right corner.
- Then tap on "General Settings".
- Scroll down a bit until you reach the "Replace character" item and tap on it.

- Enter the original and target values that you want to replace and confirm the change by tapping on "OK". The changes become active immediately.
Character encoding
The software interface of your device can transmit the scanned barcode in different encodings. Currently supported character encodings are:
- UTF-8
- UTF-16
- GBK
- Big5
- Shift_JIS (SJIS)
- ISO/IEC 8859-15 (Latin-9)
- US-ASCII
- GB 18030
To adjust the character encoding, do the following:
- In the Scanner Configuration app, tap the gear icon in the upper right corner. 2.
- then tap on "General Settings
- scroll down a bit until you reach the item "Scan encoding" and tap on it.
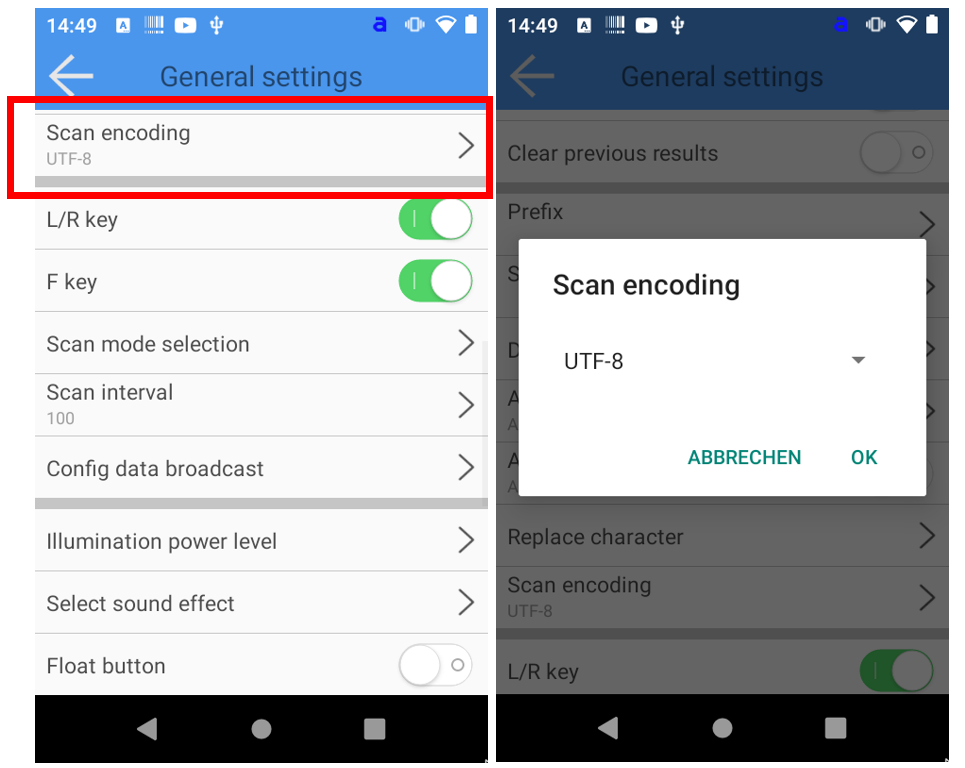
- Now select the desired character encoding and confirm the change by tapping on "OK". The changes become active immediately..

Disabling individual scan keys
Your device may have several scan keys. If a scan key is not needed in the work process, it can be disabled. All scan keys can also be deactivated. To disable a scan button, do the following.:
- In the Scanner Configuration app, tap the gear icon in the upper right corner.
- Then tap on "General Settings".
- to disable the left and right side scan keys, tap the toggle switch at "L/R Key" so that it is no longer highlighted in green.
To deactivate the central scan key, tap the toggle switch at "F key" so that it is no longer highlighted in green.
The changes are applied immediately.
Define behavior when the scan key is triggered
The behavior of your device when you press the scan key can be customized. You can choose between:
- scanning as long as one of the scan buttons is pressed
- scanning until a code is captured
- continuous scanning
To customize the behavior when the scan button is triggered, do the following:
- In the Scanner Configuration app, tap the gear icon in the upper right corner.
- Then tap on "General Settings".
- Now tap on "Scan Mode Selection" and make your selection.

- Confirm the new behavior by tapping on "OK". The changes become active immediately.
Setting the scanner scan rate
The speed of the barcode scanner of your device can be adjusted. Especially in combination with the "Continuous Scanning" function, it can lead to undesired double scanning of barcodes. The scan interval can be adjusted in millisecond increments (default value: 100). To set the scanner scan rate, do the following.:
- In the Scanner Configuration app, tap the gear icon in the upper right corner.
- Then tap on "General Settings".
- Now tap on "Scan interval" and enter the desired delay time in ms.
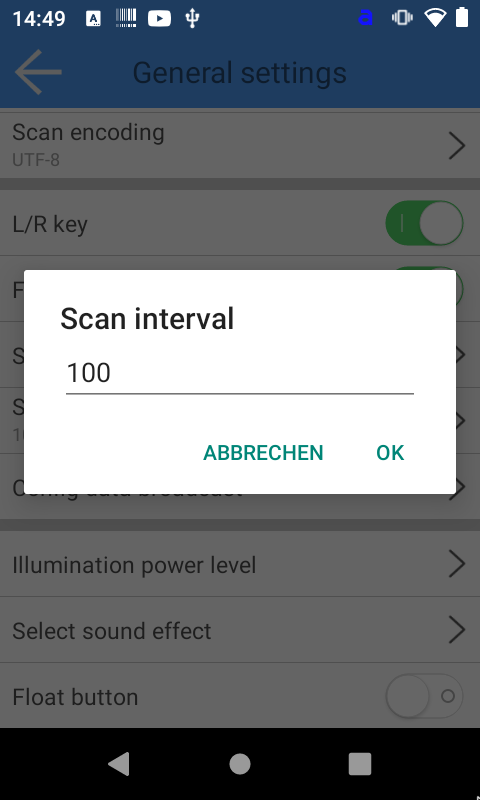
- Confirm the new behavior by tapping on "OK". The changes become active immediately.
Adjusting the LED brightness
The brightness of the barcode scanner from your device can be adjusted. This can be helpful if you regularly work on reflective or luminous surfaces (e.g. displays) or your ambient light allows a lower illumination to save battery. To adjust the LED brightness of your barcode scanner, do the following:
- In the Scanner Configuration app, tap the gear icon in the upper right corner.
- Then tap on "General Settings".
- tap on "Illumination power level" and enter a value between 0 (completely dark) and 10 (maximum brightness).

- Confirm the new behavior by tapping on "OK". The changes become active immediately.
Activating and using the "Float Button”
Your device has a so-called "Float Button". It is a software-based scan button that allows easy access to the scan function. The Float Button can be flexibly positioned on the entire screen area and overlays all other applications.
To activate the Float Button on your device, do the following:
- In the Scanner Configuration app, tap the gear icon in the upper right corner.
- Then tap on "General Settings".
- to activate the float button, tap on the toggle switch at "Float Button" so that it is highlighted green. The change becomes active immediately and the Float Button appears.
To change the position of the float button, hold a finger on the float button and then drag it to the desired position.

Disable volume buttons
It can be useful for scan-intensive processes to disable the volume buttons, which may be located near the scan button. This prevents the volume of the device from being accidentally adjusted.
To deactivate the volume keys, proceed as follows:
- In the Scanner Configuration app, tap the gear icon in the upper right corner.
- Then tap on "General Settings".
- To deactivate the volume keys, tap on the toggle switch at "Block volume keys" so that it is highlighted in green. The change becomes active immediately..
Optimizing your device to capture barcodes from screens
If you regularly capture barcodes from screens (e.g. from smartphones to capture tickets), activating "Screen Mode" can be helpful.
To activate "Screen Mode", proceed as follows:
- In the Scanner Configuration app, tap the gear icon in the upper right corner.
- Then tap on "General Settings".

To activate the Screen Mode, tap on the toggle switch at "Screen mode" so that it is highlighted green. The change becomes active immediately.
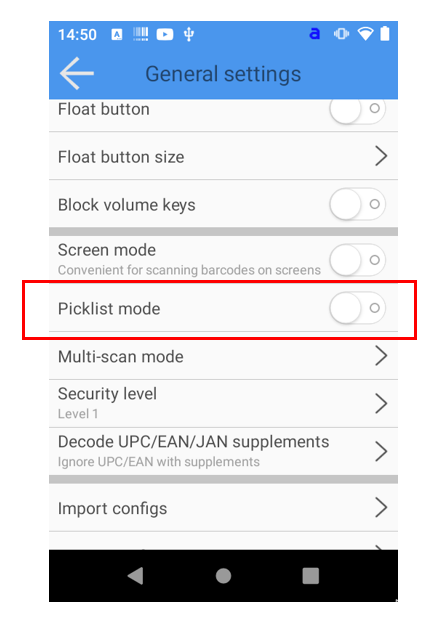
Enabling Picklist Mode
The multi-scan mode allows the scanner to decode multiple barcodes at once. This is useful if you have several barcodes right next to each other and want to capture them simultaneously
To activate the "Picklist Mode" proceed as follows:
- In the Scanner Configuration app, tap the gear icon in the upper right corner.
- Then tap on "General Settings".
- To activate the picklist mode, tap on the toggle switch at "Picklist mode" so that it is highlighted in green. The change becomes active immediately.
Activating the Multi-scan mode
Multiscan mode allows the scanner to decode multiple barcodes at once. This is useful if you have several barcodes right next to each other and want to capture them simultaneously
To activate the "Picklist Mode" proceed as follows:
- in the Scanner Configuration app, tap the gear icon in the upper right corner.
- then tap on "General Settings
- now tap on "Multi-scan mode”
- To activate the multi-scan mode, tap on the toggle switch at "Enable multi-scan" so that it is highlighted in green. 5
- Enter the number of barcodes to be scanned simultaneously under "Multi-scan count". A maximum of 5 barcodes can be captured at the same time.
- tap "OK" to confirm.
Reducing the risk of incorrect barcode capture
The decoder provides four levels of decoding security for delta barcodes, including the Code 128 family, UPC/EAN, and Code 93. Select increasing security levels for decreasing barcode quality. There is an inverse relationship between the security and the aggressiveness of the decoder, so select only the security level that is required for a particular application.
Security Level 0: This setting allows the decoder to operate at its most aggressive state while providing adequate security for decoding most "in-spec" bar codes.
Security Level 1 (default): Select this option when miscoding occurs. This default setting eliminates most miscoding.
Security Level 2: Select this option if Security Level 1 does not eliminate miscoding.
Security Level 3: Select this security level if misdecodings still occur even with security level 2. Please note, selecting this option is an extreme measure against decoding barcodes that do not meet specifications. Selecting this security level significantly affects the decoder's ability to decode. If this security level is required, try to improve the quality of the barcodes.
To adjust the security level, do the following:
- In the Scanner Configuration app, tap the gear icon in the upper right corner.
- Then tap on "General Settings".
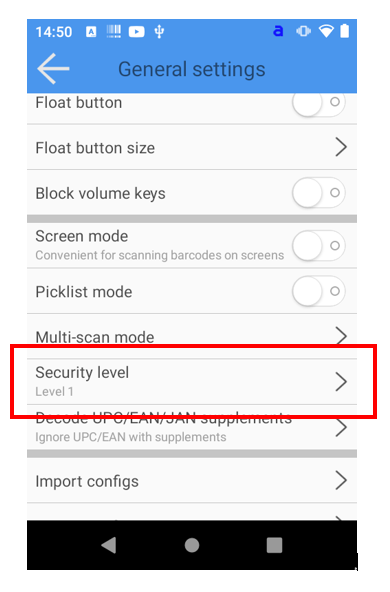
Now tap on "Security Level”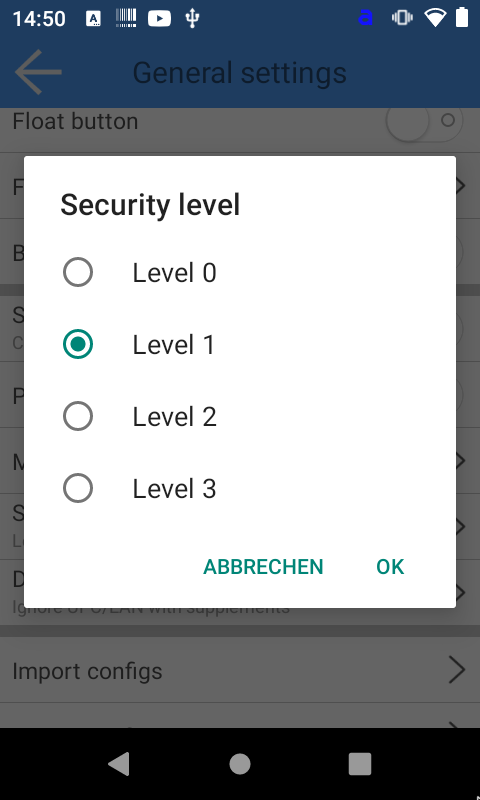
Now select the desired security level and confirm your entry by tapping on "OK"
Automatic start of the barcode scanner on system startup
- In the Scanner Configuration app, tap the gear icon in the upper right corner.
- Then tap on "General Settings".
- then tap "Auto start Service" so that the toggle switch is highlighted in green
The next time the device is started, the application will now start automatically.
The function was removed with the release of the Scanner Configuration App software version 1.2.9. The application now starts on the system side.
Selecting the barcode types used
Disabling supported barcode types can be useful to increase the performance of the integrated scanner and reduce erroneous scans. To do this, proceed as follows:
- In the Scanner Configuration app, tap the gear icon in the upper right corner.
- then tap on "Symbologies”
- in the overview, select the barcode types you are using. The toggle on the right side is highlighted in green if the corresponding type is activated. Tap on the toggle switch to activate or deactivate the recognition. The changes are applied immediately.
Configuration transfer to multiple devices
Setting up many devices at the same time can be annoying. There are two ways to transfer the configuration of the barcode scanner from one device to another:
- by means of a configuration file
- via a special configuration barcode
This function is only available as of version 1.4 of the Scanner Configuration App
Distributing the configuration to different devices
Configuration transfer by means of a configuration file
To copy the configuration of one device to another device, proceed as follows::
- open the Scanner Configuration App of the first device

- tap on the cogwheel symbol in the upper right corner
- Tap on „General settings“
- scroll down and tap on the "Export configs" entry. A QR code will appear, tap "OK" here
- then select a destination folder where you want to save the configuration by placing a check mark to the right of the folder.

- Enter a file name in the upper part of the screen.
- Tap on Select at the bottom right to save the file. The saving is confirmed by the message "Export Completed".
- Now copy the file to the second device, e.g. via Bluetooth file transfer or using a USB stick.
- Open the Scanner Configuration App of the second device
- tap on the cogwheel symbol in the upper right corner
- Tap on „General settings“
- scroll down and select tap on the "Import configs" entry
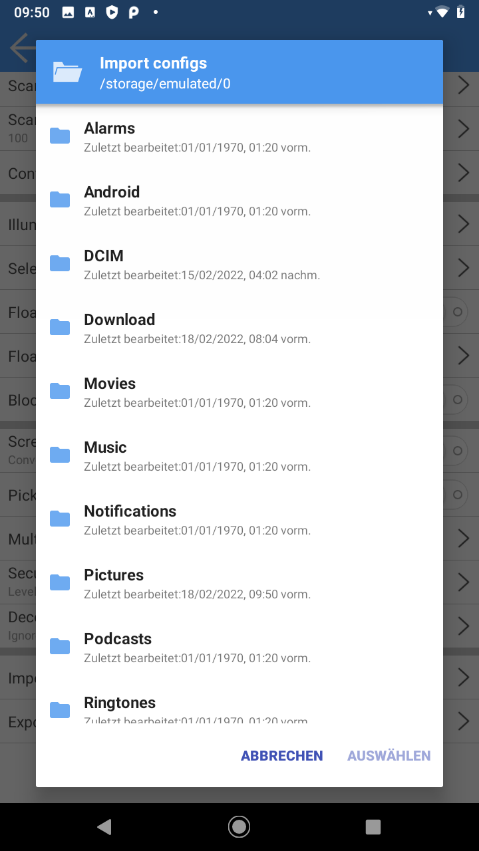
- then select the configuration file in the folder structure by placing a checkmark to the right of the file.
- Tap on Select at the bottom right to save the configuration. Saving is confirmed by the message "Import Completed".
Configuration transfer by means of a configuration barcode
To copy the configuration of one device to another device, follow these steps:
- open the Scanner Configuration App of the first device

- tap on the cogwheel icon in the upper right corner
- Tap on „General settings“

- scroll down and tap on the "Export configs" entry
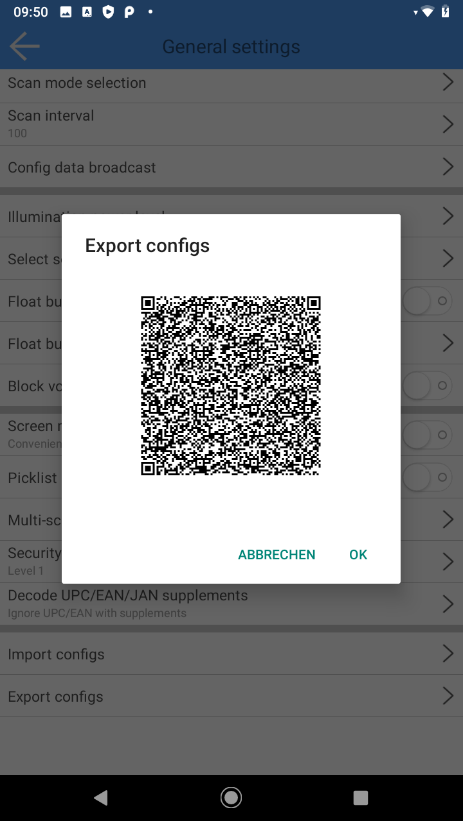
- now open the Scanner Configuration App on the second device and scan the displayed barcode.
Tip: Long press the on-off button until the menu appears and select "Screenshot" to take a screenshot for later use (e.g. for printing).
Resetting the barcode scanner
To reset the barcode scanner configuration, follow these steps:
- open the Scanner Configuration App of the first device.
- tap on the cogwheel icon in the upper right corner
- tap on "Reset configs" and confirm with "OK".