Control Center (only Windows)
The Control Center app makes it possible to adjust various configurations and functions of the device without having to go into the BIOS.
The application offers the following functions:
- Display system information
- Battery and charging settings (set charging limit, charging speed, Auto Power On)
- Changing the assignment of the function button(s)
- Switching system components on/off (buttons, LTE, GPS, ...)
- Create/restore backup
In the following chapters, you will find information on the installation and functional scope of the application. Please note that your device may not support all the features of the application and not all the functions described may be displayed.
Installation and operation
Preparations
If the Control Center app is offered to you in the download portal, you can use the functions of the Control Center app.
Note: First uninstall the old version of the AppService tool and other associated software, if installed.
To be able to use the application, you must first ensure that the BIOS and EC version of your device is compatible.
You can download the latest BIOS and EC firmware for your device at https://www.werocktools.com/support/downloads/ by entering the serial number of your device and downloading the corresponding file. You will also find update instructions for the BIOS and EC update there.
Installation
Note: Administrator rights are required to install and use the program.
To install the ControlCenter app, proceed as follows:
- Download the application at https://www.werocktools.com/support/downloads/. Enter the serial number of your device to access the download.
- Unzip the downloaded ZIP folder on the tablet (right-click -> Extract all)
- Install the application by executing the EXE file from the unzipped folder.
- Follow the instructions of the installer.
Operation
Opening the Control Center app
As soon as the Control Center software is installed, it is automatically started and hidden in the taskbar every time the device is started or restarted. You can open the program by clicking on the icon.
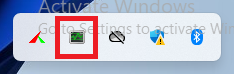
If the icon is not displayed in the taskbar, expand the icons by clicking on " ".

You can also open the Control Center with the key combination "CTRL+Q".
Overview
When you open the Control Center, you will see the following overview page:
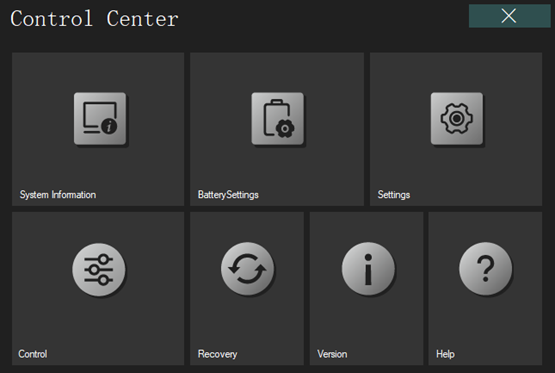
The homepage is divided into the following seven main areas:
- System Information: Display system details
- Battery Settings: Display and change charging and battery-related settings
- Settings: Hardware-related settings (function key assignment, fan control)
- Control: Activate/deactivate hardware features
- Recovery: Recovery options
- Version: Display software and BIOS information, update the Control Center app
- Help: Help for using the application
The individual areas are explained in more detail in the following chapters.
Display system information
In this section, you can display system information about your device. The "Home Page" button takes you back to the start page.
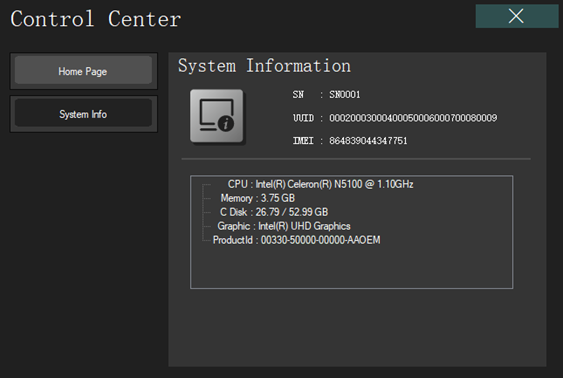
The following information is displayed:
- SN (serial number): Factory serial number of the device
- UUID: Universally unique hardware identifier
- IMEI: International Mobile Equipment Identifier.
- CPU: Designation of the processor model installed, clock frequency (@ X.XXGHz)
- Memory: Available RAM memory size
- C Disk: Use of the system drive C:, available storage space/total storage space
- Graphic: Model of the graphics card
- ProductId: Information on the activation key
Battery and charging settings
In this section, you can adjust the charging behavior of the device. The section consists of three subsections that can be accessed via the buttons on the left (Battery Settings, Charger Settings, Auto Power On Settings). The "Home Page" button takes you back to the start page.

Battery Settings
Normal mode (Normal)
In this mode, the charging curve of the battery is automatically adjusted and optimized. In this mode, the maximum charging quantity is automatically adjusted based on the battery's charging and discharging cycles.
Reserve mode (reserve)
In reserve mode, you can set the maximum charging percentage. It can be set to: 50%, 60%, 70%, 80% (standard), 90%.
This protects the battery from overcharging and extends its service life, which is suitable for environments in which the adapter is used over a longer period of time.
Cycle reserve mode (can display 100%) (Reserve Circle (disp=100%))
In this mode, the battery curve is stretched on the basis of conservation, e.g. the charge can only reach 70%, but 100% is displayed in the system (in reality, the charge ends at 70%).
Note: The percentage settings in the drop-down list are only effective if they are set to "Reserve mode" or "Cycle reserve mode".
Charger Settings
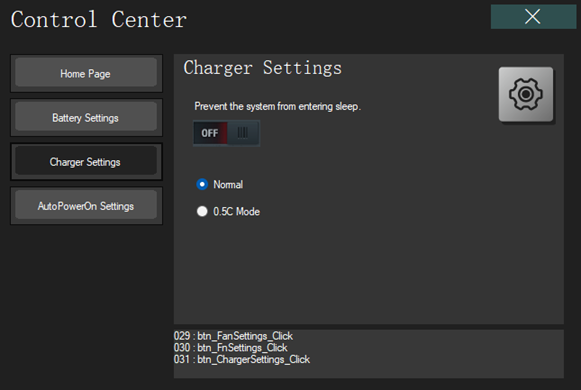
Normal mode
This is the standard mode. 1C charging when switched on, 0.5C charging (half charging speed) when switched off.
0.5C mode
0.5C charge when switching on, also 0.5C charge when switching off. Never switch to sleep mode.
"Never Sleep" switch
The Never Sleep switch prevents the system from going into sleep mode when it is switched on. This is suitable for scenarios in which the screen must remain switched on at all times.
Auto on/off settings
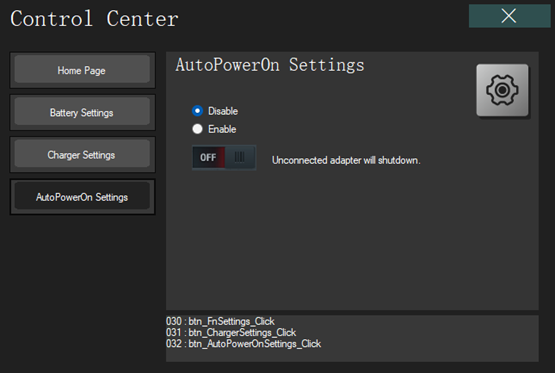
Disable
Default setting. The automatic switch-on function is not activated.
Enable
Activates the switch-on function. If the device is switched off and is plugged in for charging, the device switches on automatically.
Unconnected adapter will shutdown
The system switches off automatically when the mains adapter is unplugged. The standard time is 10 seconds. If you activate this function, the device switches off within 10 seconds of the adapter being disconnected.
If the adapter is plugged back in for charging within 10 seconds, the switch-off is canceled. If this function is switched off within 10 seconds, the switch-off is also canceled.
Note: If the automatic switch-on function is switched off, the automatic switch-off function is also switched off.
Changing the assignment of the function button(s)/fan control
On these pages you can customize the function of the hardware buttons of the device as well as the fan control. The "Home Page" button takes you back to the start page.
Please note that, depending on the device, not all settings may be relevant, as your device may not have all the buttons listed.
P1 button settings

Select what should happen when you press the "P1" button.
Barcode Trigger
Pressing the button automatically starts the 1D/2D barcode scanner module and begins scanning (if your device is equipped with a barcode scanner). This setting is saved automatically. It remains active even if the Control Center software is uninstalled.
Windows Key
In "Windows Key" mode, pressing the button triggers the Windows key. This setting is saved automatically. It remains active even if the Control Center software is uninstalled.
Ctrl+Alt+Del
When you press the button, the key combination Ctrl+Alt+Del is triggered. This setting is saved automatically. It remains active even if the Control Center software is uninstalled.
Launch Application
External program call: Exe/Shortcut/Cmd script start. If you select this item, you can search for and select the exe or link startup file you want to call. This setting requires the Control Center to work; uninstalling the Control Center will disable the external program call feature.
If this function is activated, the button value 243 is also output when the button is pressed. The user can call up this value to implement user-defined functions.
Note: You can select "C:\Program Files\OEM\ControlCenter\CMD_Process.exe" via Start application. Then change the content of "C:\Program Files\OEM\ControlCenter\CMD_Process.cmd" to call up any software to be started. CMD_Process.exe will automatically execute CMD_Process.cmd at startup.
TabTip Keyboard
External call of the soft keypad. If this function is activated, the key value 243 is reported when the key is pressed. This setting requires the Control Center to work; if you uninstall the Control Center, the external call function will be deactivated.
Camera Trigger
Open the Microsoft camera app. If this function is activated, the key value 243 is reported when the key is pressed. The Control Center is required for this setting. If you uninstall the Control Center, the function for external calls is deactivated.
Torch (flashlight)
When this function is activated, pressing the button switches the flashlight (camera flash) on or off. This setting is saved automatically. It remains active even if the Control Center software is uninstalled.
Control Center
If this function is activated, pressing the button opens the Control Center app.
Customer
The EC chip reports the key value 243 and the Control Center does not process the received key value 243. Users can implement their own functions. This setting is saved automatically. It remains active even if the Control Center software is uninstalled.
Disable
Deactivate the button function. This setting is saved automatically. It remains active even if the control center software is uninstalled.
P2 button settings
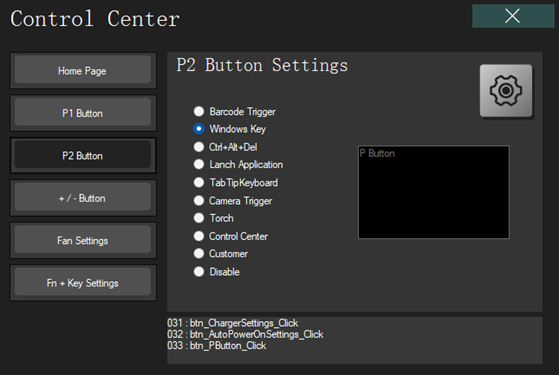
Select what should happen when you press the "P2" button. The available settings correspond to the settings for the "P1" button, see there for explanations.
+/- - Button settings
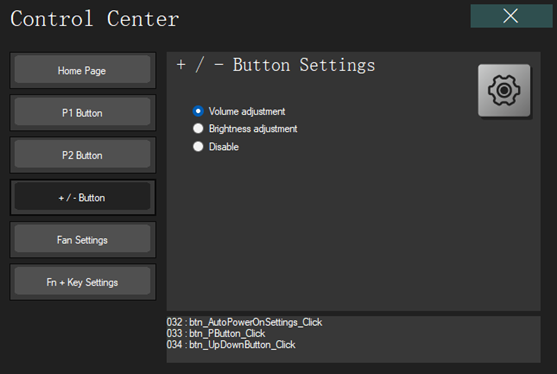
Select what should happen when you press the "+" and "-" buttons.
Volume adjustment
Use the buttons to adjust the volume.
Brightness adjustment
Use the buttons to set the screen brightness.
Disable
Deactivate the buttons.
Fan settings
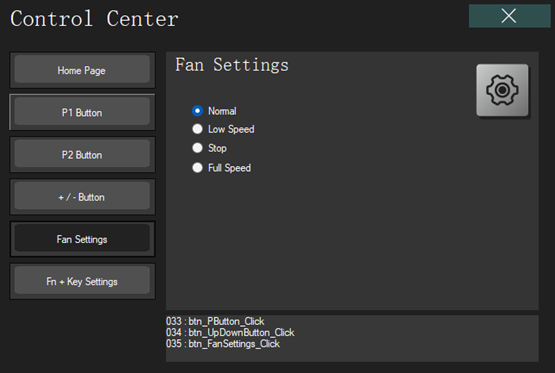
Set the fan behavior here (if your device has a fan).
Normal
Normal mode; the fan speed is adjusted automatically. This mode is recommended.
Low Speed
The fan speed is reduced. This allows you to work more quietly, but can lead to excessive heating of the device.
Stop
The fan is deactivated. Prevents fan noise, but can lead to severe performance impairments and heating of the device due to the lack of cooling. Its use is not recommended.
Full Speed
The fan runs continuously at the highest level. Causes a lot of noise, but ensures a constantly high cooling capacity.
Keyboard settings
These settings are only displayed if your device has a keyboard.
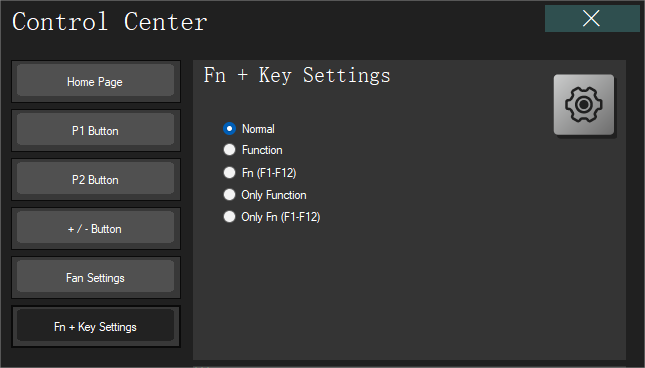
Normal
The F keys work according to the keyboard labeling.
Function
The F buttons trigger the printed functions; to trigger the corresponding F button (F1...F12), the FN button must also be pressed.
Fn (F1-F12)
The F buttons work as such; the FN button must also be pressed to trigger the functions.
Only Function
The F buttons only trigger the functions; the corresponding F button (F1...F12) cannot be used.
Only Fn (F1-F12)
The F buttons only work as such, the additional functions cannot be used.
Switching system features on and off
On this page you can switch the individual functions of the device on or off. The "Home Page" button takes you back to the start page.
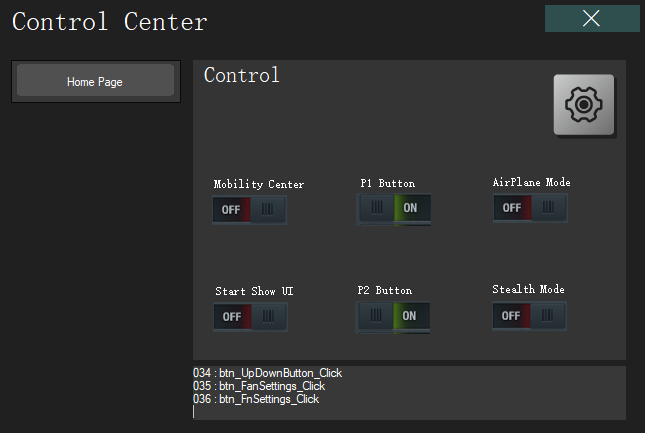
Mobility Center
Show the Windows Mobility Center.
P1 Button
Activate or deactivate the P1 button.
P2 Button
Activate or deactivate the P2 button.
Airplane Mode
Switch flight mode on or off.
Start Show UI
Switch on or off whether the start page of the Control Center should be displayed automatically or not when the system is started.
Stealth Mode
Activate stealth mode. Stealth mode deactivates the wireless connections (Bluetooth, WLAN, GPS, mobile data), mutes the speakers and sets the screen brightness to the lowest level.
Note: All of the above settings, with the exception of the mobility center, can be saved; restarting or shutting down does not change the status of the settings.
Backup & Recovery
This item takes you to the restore mode to create or restore a backup of your device data. The "Home page" button takes you back to the start page.
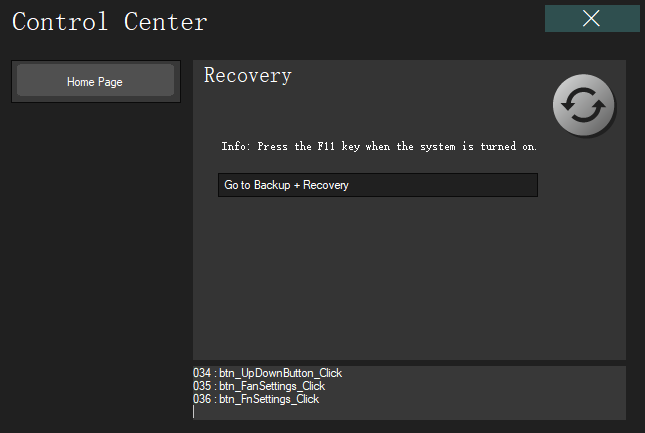
To open the recovery mode, click on "Go to Backup + Recovery". Then restart your system to boot into the recovery environment, which looks like this:
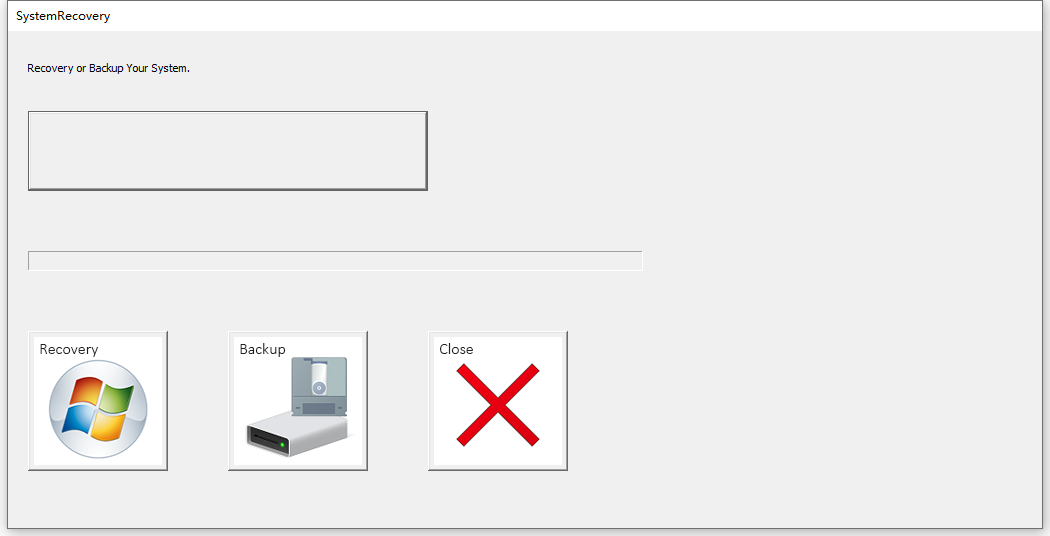
Create backup
To save a backup, you need a USB flash drive that meets the following requirements:
- It must be an NTFS formatted USB drive (FAT32 cannot save a file larger than 4GB)
- There must be an "OEM_1KeyRecovery" folder in the root directory of the USB drive.
- There must be a file "OEM_1KeyRecovery.txt" in the "OEM_1KeyRecovery" folder.
- The USB flash drive must have sufficient storage space to store your data and the operating system.
The backup file is automatically saved in the OEM_1KeyRecovery folder and has the name "OEM_1KeyRecovery.wim".
This "wim" file is also used to overwrite the C: drive during recovery.
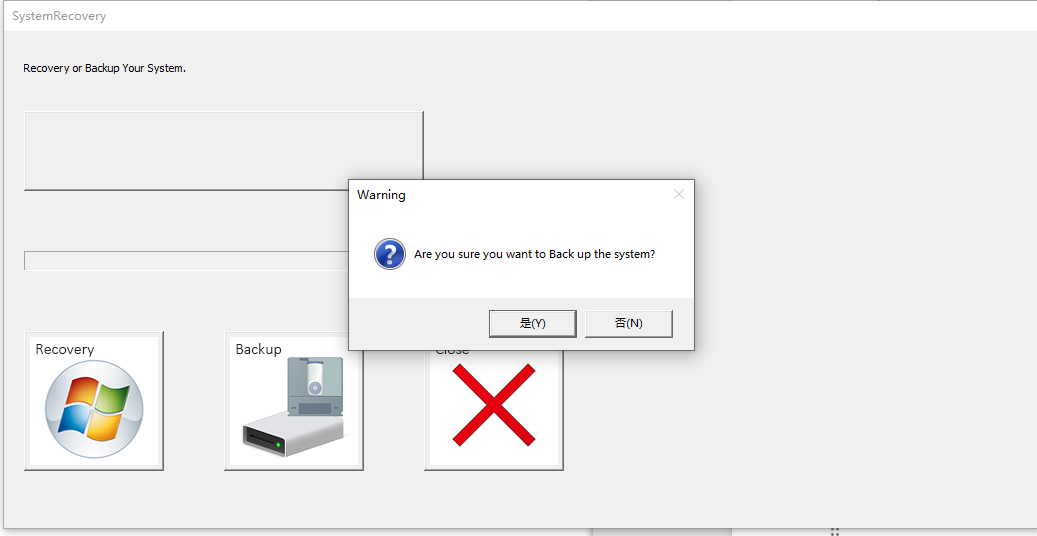
Proceed as follows to create a backup:
- Connect the backup USB stick and click on the "Backup" button to start backing up the system.
- Click Yes (Y) to start the backup.
- Wait until the process is complete. Depending on the amount of data to be backed up, this may take some time. Once the process is complete, you will see the following screen:

- Click on "Close" to close the recovery environment.
Note: If there is already a backup file on the stick, this must first be deleted in order to create a new backup. Otherwise an error message will appear.
Restore backup
Proceed as follows to restore a created backup:
- Connect the USB stick with the backup file on it.
- Click on "Recovery" to start the recovery process.

- Click Yes (Y) to start the recovery. This process may take some time.
Note: Restoring irretrievably deletes all data previously stored on your device!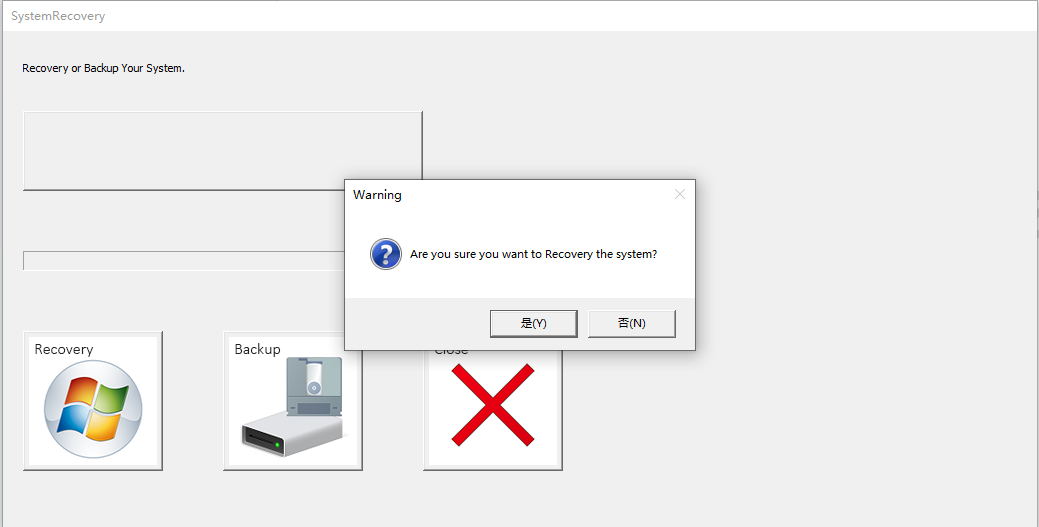
- Once the restore is complete, you will see the following screen:
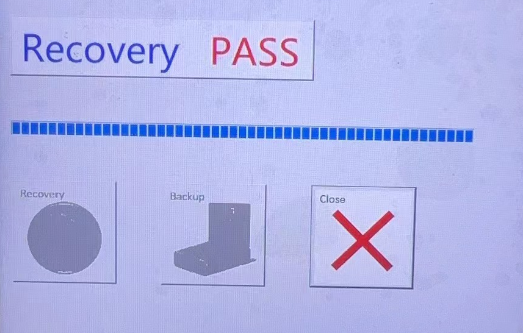
- Click on "Close" to end the process and restart the system. The recovery is complete.
Version
Shows general version information about the software, allows you to update the Control Center and change the language. The "Home Page" button takes you back to the start page.
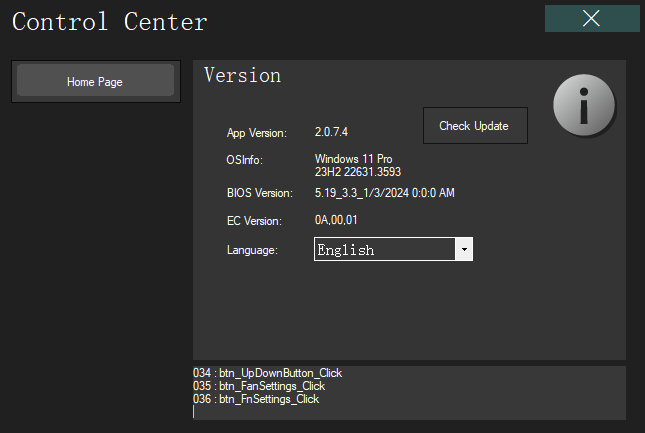
Shows the following information:
- App version: Software version of the Control Center
- OS Info: Operating system information (version, build)
- BIOS version: BIOS version information
- EC version: EC version information
- Language: Language switch (currently only available in English and Chinese)
- Check Update: Check for updates (requires Internet connection)
Help
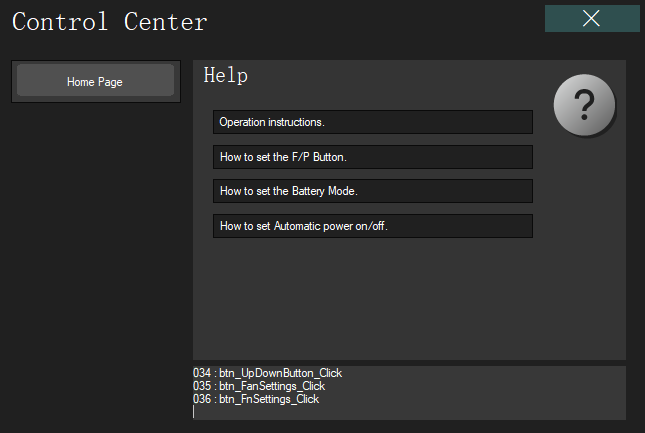
The links will take you to help videos that explain the functions of the Control Center in more detail.
- Operation instructions
- How to set the F/P button
- How to set the Battery Mode
- How to set Automatic power on/off