First start
Before using the product for the first time and before using it in everyday life, read the following instructions. This chapter provides information on the correct installation, connection and use of the product.
|
Hint: Items not included in the delivery are sold separately. |
|
HINT |
|
|
|
Damage of the display Do not place heavy objects on the computer, this could damage the display. |

|
Hint: Before connecting the product to a power outlet, make sure that the power cord is not pinched or damaged. Also make sure that the power output is within the voltage range of the product. |
First-Time operation
To put the Rocktab U200 into operation, proceed as follows:
- Install the SIM card.
- Install the memory card.
- Install the battery.
- Charge your tablet.
- Boot the tablet.
|
|
|
|
|
Disconnect all cables from the tablet computer before installing or removing the battery. |

Installation SIM card
Note that the 4G LTE feature is optional and may not be supported by your device. Check your order specifications for more details.
Rocktab U212
- Remove the battery as described in the section "Installing the battery" if the battery is already installed.
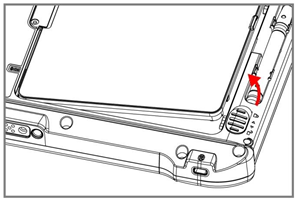
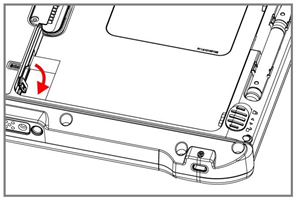
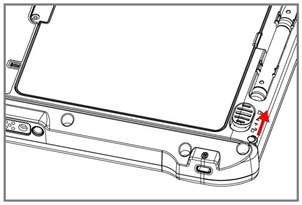
- Open the rubber protection of the SIM card slot.
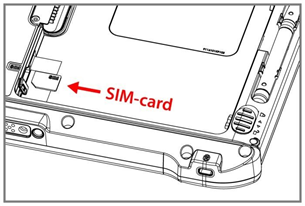
- Insert the SIM card all the way. Chip/contact down.
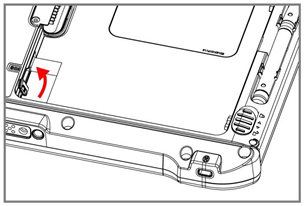
- Close the rubber protection of the SIM card slot.
- Insert the battery again. Make sure that the battery is fully inserted and lies flat against the housing.

- Slide the battery lock to the "Locked" position.
Rocktab U214
|
|
|
|
|
Please make sure that the tablet is turned off before opening the service window to insert the SIM card. |
Follow these steps to install the SIM card in the tablet computer:
- Disconnect all cables connected to the tablet computer.
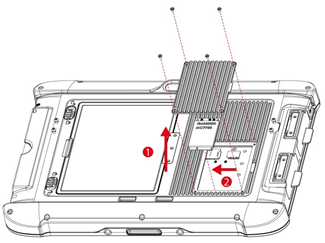
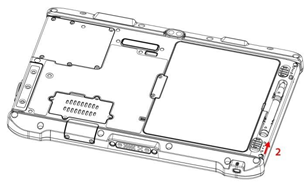
- Remove the service window on the back by unscrewing four screws.
- Remove the screw that secures the 4G LTE module.
- Carefully lift the 4G LTE radio module upwards, taking care not to damage the connected cable.
- Make sure that the contact field of the SIM card IC is facing down; the notch is in the insertion direction (to the right).
- Insert the 4G LTE SIM card into the slot located on the right side of the service window.
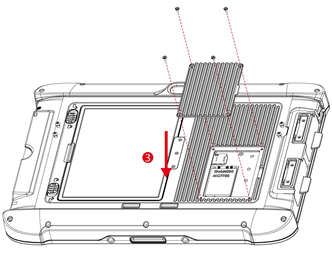
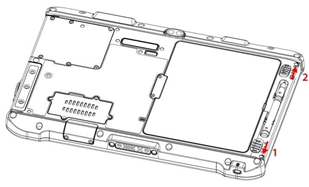
- Replace the removed 4G LTE module screw to secure the 4G LTE module.
- Reinsert the four removed service window screws to secure the service window.
Installation memory card
Your tablet supports additional storage with an optional micro SDXC card.
To install the micro SDXC card:
- Open the protective I/O cover by pulling out the latch.
- Insert the Micro-SDXC card into the slot with the contacts facing down.
- Press on the card to make sure it is seated properly.
- Close the protective I/O cover.
To remove the micro SD card:
- Open the protective I/O cover by pulling out the latch.
- Briefly press the micro SD card to unlock it.
- Pull out the micro SD card.
Installation battery
Rocktab U212
To install the standard battery:
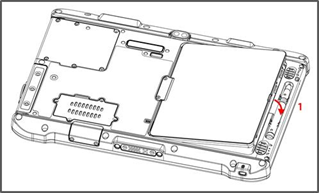
- Turn the tablet over with the back facing up.
- Insert the battery with the side with the connector pins first, and then lower the battery into the battery compartment. Make sure the battery is fully lowered into the compartment. Once fully inserted, the battery release slide will lock automatically. The battery will lie flat in the case once fully inserted.
- Slide the battery lock to the "Locked" position.
To remove the battery:
- Shut down the tablet (or put it into sleep mode). Turn the tablet computer over with the back facing up.
- Slide the battery latch to the unlocked position.
- Pull the spring-loaded battery release slide upward and hold it.
- Lift the battery out using the opening on the side of the battery compartment.

Installation battery
Rocktab U214
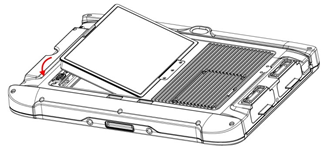
To insert the supplied standard battery:
- Disconnect all cables connected to the tablet computer.
- Turn the tablet computer over so that the back is facing up.
- Locate the battery lock slide and slide it to the "Unlocked" position.
- Locate the battery unlock slide, which is spring-loaded. Pull it back and hold it in place.
- Insert the battery on the terminal pin side first, then lower the battery into the battery compartment.
- Continue to hold the battery release slide until the battery is fully inserted.
- Make sure the battery is fully lowered into the compartment before releasing the battery release slide.
- The battery will lie flat against the case when fully inserted.
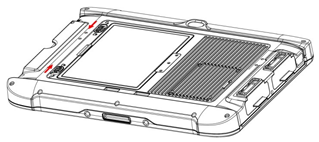
To remove the battery:
- Turn off the tablet computer (or put it to sleep). Disconnect all cables connected to the tablet computer.
- Turn the tablet computer over so that the back is facing up.
- Locate the battery lock latch and slide it to the "Unlocked" position.
- Locate the battery unlock slide, which is spring-loaded. Pull it back and hold it firmly.
- Lift the battery out via the opening on the side of the battery compartment.
Charging the tablet
The tablet computers are powered either by external AC power or by internal battery. It is recommended to use alternating current (AC) power when you start the tablet computer for the first time.
|
|
|
|
|
Use only the AC adapter supplied with your tablet computer. Use of other power adapters may damage the tablet computer and the battery. |
Follow these steps to connect the tablet computer to AC power:
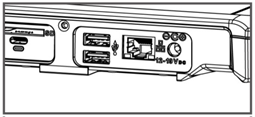
- On the side of the tablet computer, lift the protective I/O cover by pulling the latch.
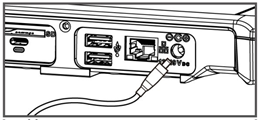
- Plug the DC power cord from the power adapter into the power jack on the tablet computer.
- Plug the power cord into the power adapter.
- Finally, plug the power cord into the power outlet.
When the power adapter is plugged in, the battery begins charging. The battery LED indicator on the tablet computer shows various states. Please refer to the description of the LED indicator.
- The battery LED indicator shows different battery states:
- Orange - AC adapter is plugged in and battery is charging.
- Green - AC adapter is plugged in and battery is fully charged.
- Solid red - Low battery level (<10%).
- Flashing red - Battery is being replaced during operation.
- No light - Battery is being used and charged (>10%).
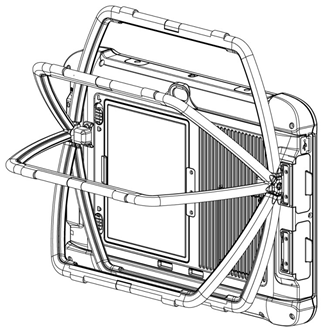
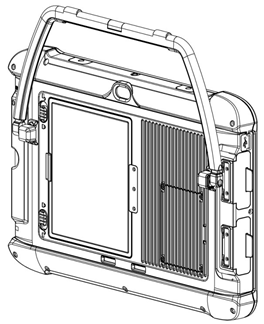
Adjusting the kickstand position (Rocktab U214)
The Rocktab U214 tablet has an integrated kickstand. The user can adjust the kickstand for variable positioning on any surface. The stand can also be used as an ergonomic handle for easy carrying. To use it as a handle, simply set the kickstand to the top position.
First start
|
NOTE |
||
|
|
First startup When powering on the device for the first time, make sure that there is any interruption during the Windows setup process, e.g. due to accidental power off. If this has happened, please enter the recovery menu by pressing the Fn1 key on the front panel to initiate the recovery process. |
|
Press and hold the power button for 3 seconds until the blue LED power indicator lights up. Do not press the power button repeatedly. Do not perform the following procedures until the HDD activity indicator turns off:
- Connecting or disconnecting the power adapter
- Pressing the power button
- Touching the tablet buttons, screen, or external keyboard/mouse.
To turn off the tablet computer:
1. Make sure you have closed all programs open on the desktop. Start screen apps do not need to be closed.
2. tap the Windows logo
3. tap on the on/off logo
4. tap Shutdown.
5. wait for the tablet computer to turn off.
|
NOTE |
||
|
|
Forced shutdown The computer is forced off when the Power button is pressed and held for 6 seconds or longer. |
|